Manual Bottle Labelers for Small Jars and Bottles
6th Nov 2026
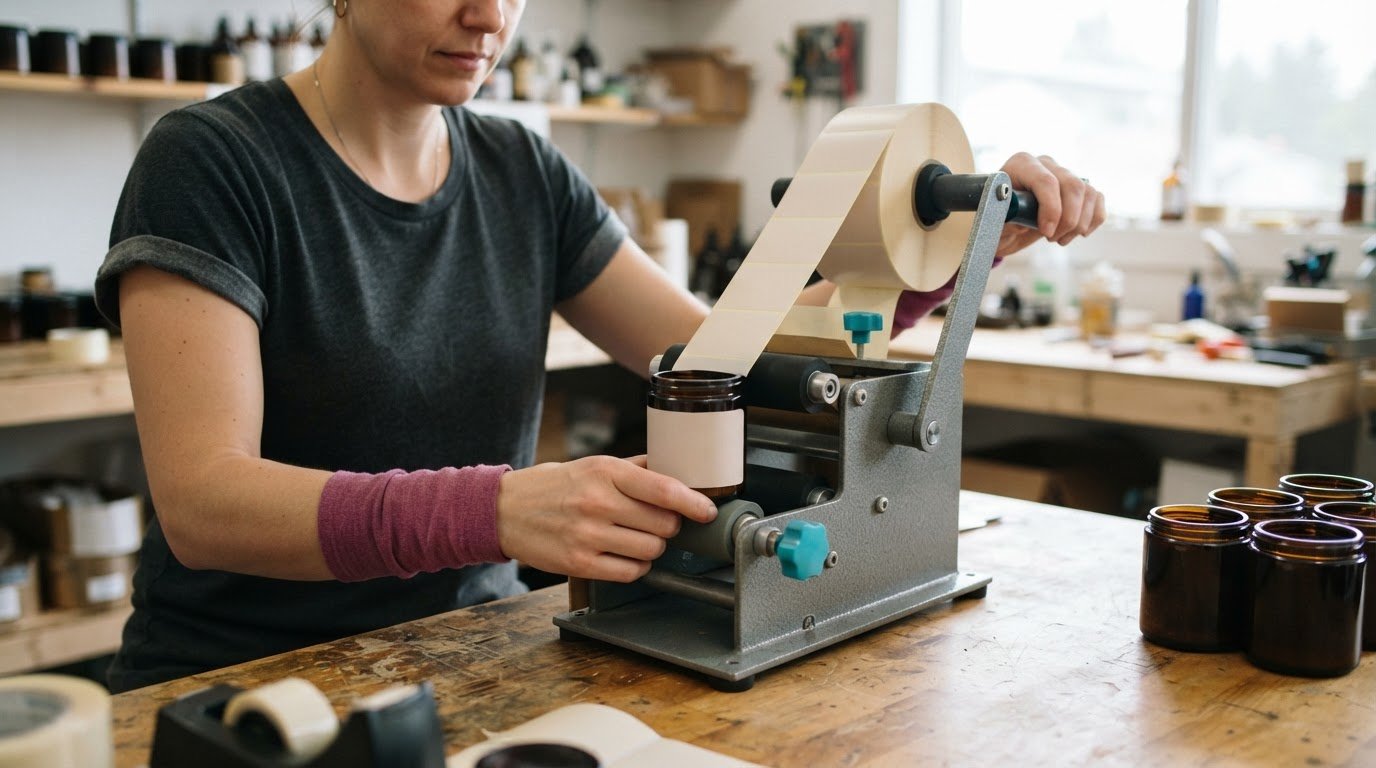
For small batches, a manual bottle labeler for small jars and bottles can apply labels to cylindrical containers when the container dimensions and label size suit the machine. Manual tabletop models use rollers to hold bottles as the label feeds around the surface, helping with consistent placement. One manual applicator listing specifies a maximum rate of 30 labels per minute, though actual output depends on the operator, container handling and setup.
Choosing a labeler is about more than finding a machine that fits on a workbench. Container shape, label size, roll compatibility and production pace all affect whether manual application is practical. This guide explains the differences between round and square containers, what to consider with manual versus semi-automatic labelling, and how setup and technique affect alignment and speed, helping you choose an approach that suits your workflow.
Key Takeaways
- Match the applicator to your container’s shape and dimensions; round bottles and square jars may need different handling.
- Compare the label’s width and length limits with your roll’s core size and diameter before choosing a machine.
- Manual models can suit smaller production runs, while semi-automatic equipment may fit workflows that need a different pace or level of assistance.
- Roller support and a consistent application technique can help reduce bubbles, crooked labels and rework.
- Treat listed application rates as maximums, since operator handling, container loading and setup affect real-world throughput.
Round versus square container compatibility
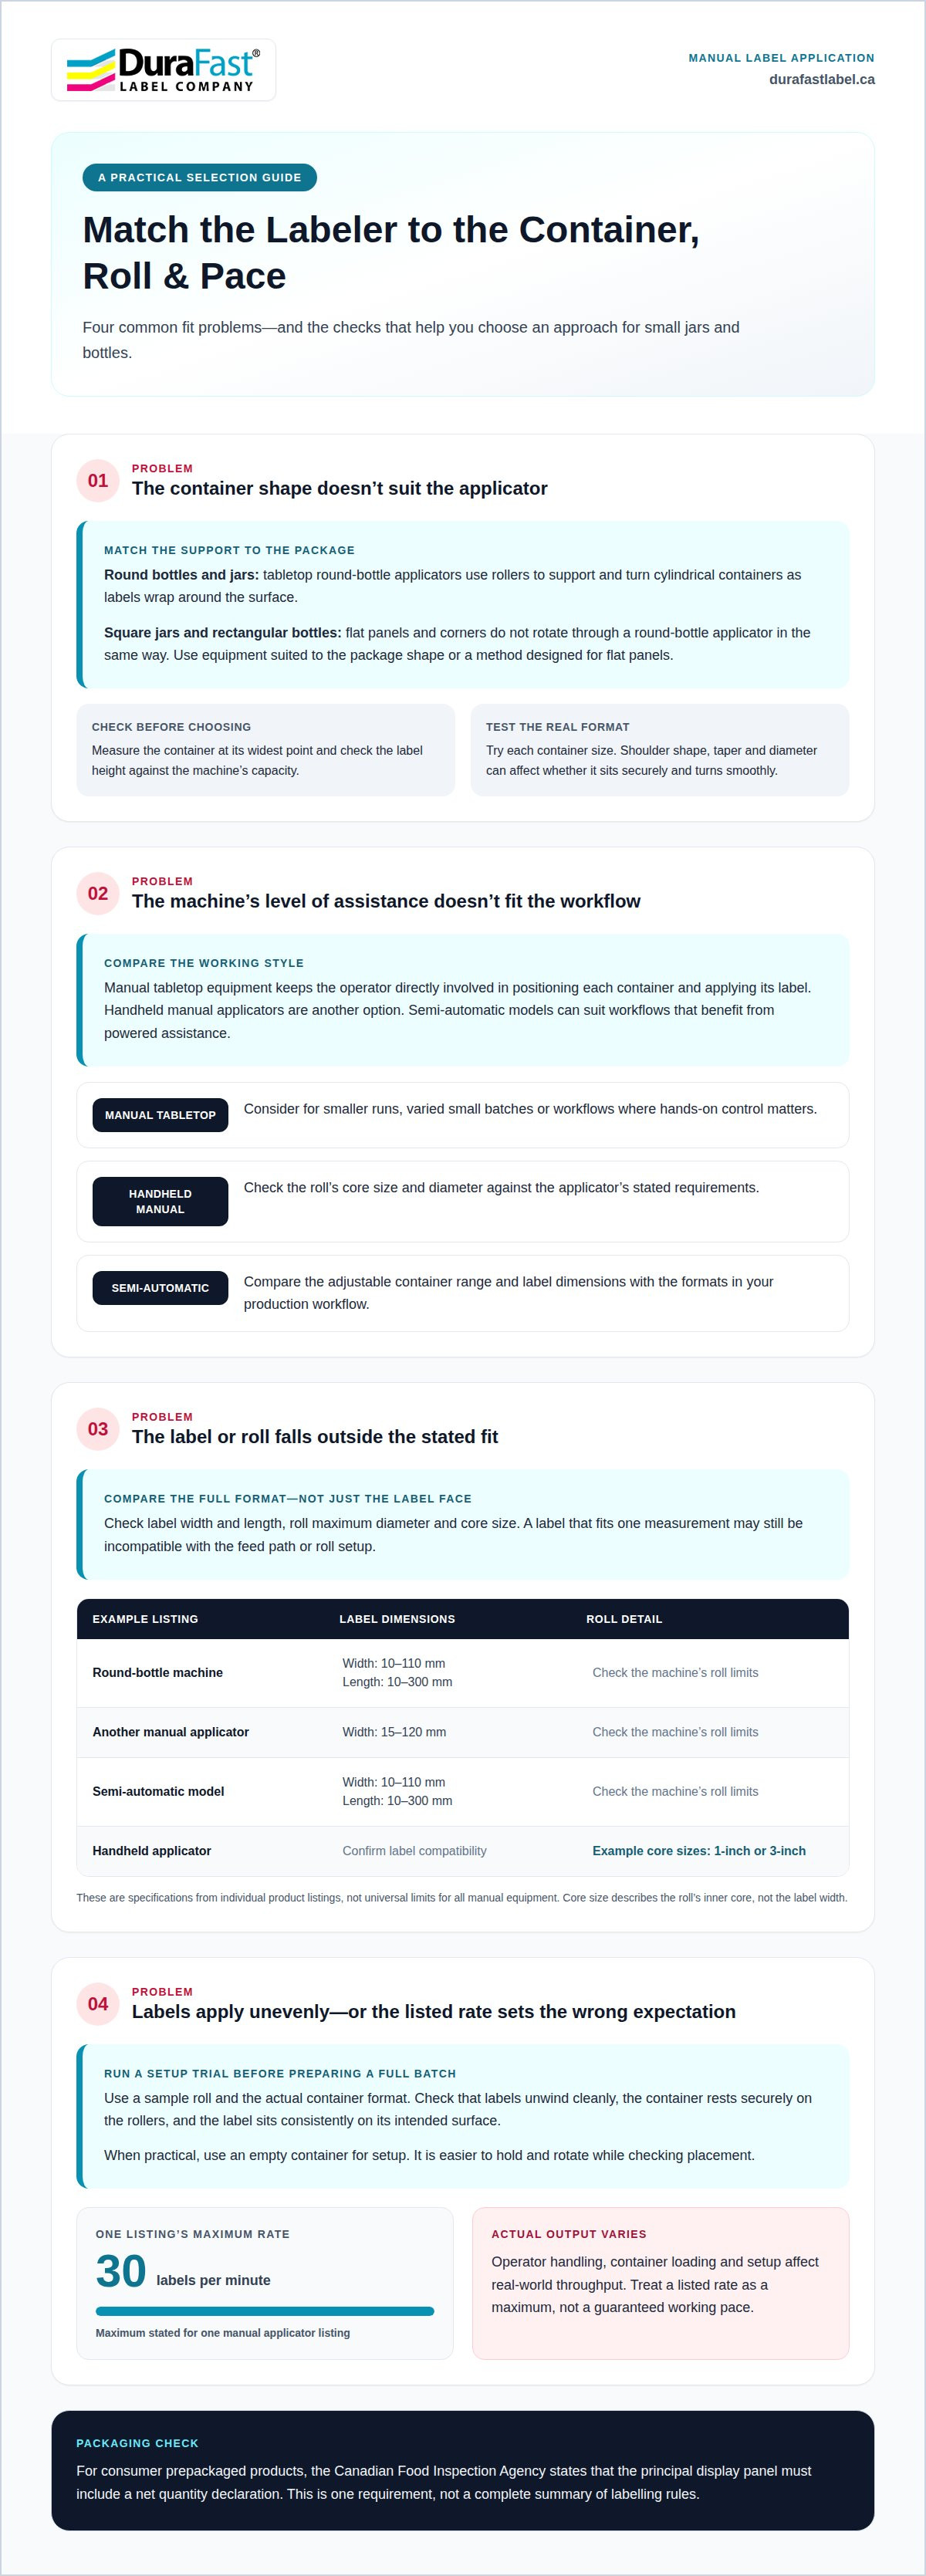
Container shape affects how an applicator supports and moves each jar or bottle. A manual bottle labeler for small jars and bottles should suit both the container’s diameter and the label’s height.
Round Container Fit
Manual round-bottle applicators guide cylindrical containers as labels wrap around their curved surfaces. Tabletop models use rollers to support and turn bottles during application. Glass beverage bottles, plastic cosmetic bottles and round food jars are examples to assess, provided their dimensions suit the equipment. Square containers have flat panels and corners, so they do not rotate through a round-bottle applicator in the same way.
Container Diameter Matching
Measure the container at its widest point, then compare its diameter with the applicator’s stated range. Check the label height against the machine’s capacity, too. A suitable diameter alone does not mean the label will fit. For example, a narrow jar and a wider bottle may need different roller settings. Test every container format you plan to label, including different sizes in the same product line.
Use empty containers for setup and testing when your workflow allows. An empty glass jar or plastic bottle is easier to hold and rotate than a filled product, allowing access to the intended label surface. Test the actual container rather than relying on a similar sample. Differences in diameter, shoulder shape or taper can affect how a label sits.
Glass and plastic can both work, but material alone does not establish compatibility. A cylindrical glass jar and plastic bottle may have similar diameters but differ around their shoulders or contours. Place each container in the applicator and check that it rests securely on the rollers and turns smoothly. This practical test shows whether its shape stays stable throughout application.
Round formats include straight-sided jars and bottles, as well as containers with a modest taper. A pronounced shoulder or changing diameter can interrupt the label’s path, so consider where the label will sit. Square jars and rectangular bottles need a different approach. A manual bottle labeler for small jars and bottles designed for cylindrical containers may not guide square corners evenly. Choose equipment suited to the package shape or a method designed for flat panels.
Label placement matters for Canadian consumer prepackaged products. The Canadian Food Inspection Agency states that the principal display panel must include a net quantity declaration. Plan the label’s position and size so the declaration can appear on that panel. Choosing a manual bottle labeler for small jars and bottles means considering both this packaging layout and how the container sits during application.
Manual and semi-automatic labeler comparison
For small jars and bottles, tabletop manual round-bottle applicators suit cylindrical containers and smaller production runs. Handheld applicators offer another manual option, while semi-automatic models can suit workflows that benefit from powered assistance. The right labelling machine depends on container shape, label format, roll compatibility and the pace operators need to maintain.
Canadian requirements depend on the product and its packaging. For consumer prepackaged products, the principal display panel must include a net quantity declaration, according to the Canadian Food Inspection Agency. This is one labelling requirement, not a complete summary of the rules for food, cosmetics or other products.
Manual tabletop equipment keeps the operator directly involved in positioning each container and applying its label. That approach can work well for short runs, varied small batches or operations where hands-on control matters. A semi-automatic round-bottle applicator is another option for cylindrical containers. Its adjustable format can accept labels from 10 to 110 mm wide and 10 to 300 mm long, according to a product listing.
Compare label dimensions before selecting either machine type. Listed manual models vary: one round-bottle machine accepts label widths from 10 to 110 mm and lengths from 10 to 300 mm, while another manual applicator lists widths from 15 to 120 mm. These are specifications for individual listings, not universal limits for all manual equipment. A label outside a model’s range may not feed or apply as intended.
Roll fit matters just as much as the label face. Check both the roll’s maximum diameter and its core size against the machine’s requirements. A handheld applicator listing, for example, specifies compatibility with 1-inch or 3-inch cores. Those measurements describe the roll’s inner core, not the label width. Confirm the complete roll format before planning a production run.
- Manual tabletop: Consider this format for small or mid-sized runs and operator-led application.
- Handheld manual: Match the roll core and diameter to the applicator’s stated limits.
- Semi-automatic: Compare the adjustable container range and label dimensions with your production formats.
Label type and format must suit the feed path, backing and applicator design. A small rectangular label and a wraparound label require different positioning, even if both fit the stated width range. Prepare a sample roll and container for a setup trial. Confirm that labels unwind cleanly and sit consistently on the intended surface. This practical test can reveal a mismatch before you prepare a full batch.
Manual label application and alignment
A manual applicator supports repeatable placement by guiding each container and label through a controlled motion. Alignment depends on setup, label position and how consistently the operator handles each item.
Label Alignment and Repeatability
Tabletop applicators use rollers to hold cylindrical bottles while labels feed around the surface. This controlled movement can reduce bubbles and misalignment compared with applying each label entirely by hand. For consistent results, use the same starting point and handling motion for every container in a batch. A stable work surface also helps prevent the applicator and label roll from shifting during use.
Run a sample container through the applicator before labelling the full batch. Check whether the label sits level, meets at the intended seam and lies smoothly across the surface. If it lands crooked, adjust the container’s starting position or the operator’s technique, then test again. Accurate placement from the start can reduce rework, wasted labels and workflow interruptions.
Bottle Shape and Label Placement
Shape affects how a container moves and where the label sits. A straight-sided cylinder offers a consistent surface as it rotates, while a tapered bottle or one with a pronounced shoulder changes diameter along its body. Position the label on the most even area. A label that crosses a shoulder or narrowing section may wrinkle, lift or look uneven.
For a bottle with a seam, raised feature or curved shoulder, identify the label panel before loading it. Keep the label clear of edges or contours that interrupt smooth contact. If the label is meant to wrap around the bottle, check that its leading and trailing edges meet as intended. A small change in placement can affect the finished look across the entire batch.
Follow a repeatable setup sequence to identify alignment problems early. Keep the container orientation and intended label position consistent during testing. Once the sample looks right, maintain the same technique throughout the batch.
- Place one sample container in the applicator and align its label area with the feed path.
- Apply the label with a steady turn, keeping the container supported on the rollers.
- Inspect the top and bottom edges, surface smoothness and seam position before continuing.
Compare the first labelled sample with the next few containers. Look for a recurring shift, such as labels sitting higher on each bottle or seams drifting around the circumference. If you spot a pattern, correct the starting position or handling motion. When container shapes vary within a batch, group matching formats together. Switching between a straight-sided jar and a tapered bottle can change how each one sits and rotates.
Manual labelling speed and throughput
A listed manual bottle applicator has a maximum application rate of 30 labels per minute. A semi-automatic round-bottle applicator listing gives a rate of 30 pieces per minute. Treat both as listed maximums, not a production plan: container loading, label positioning and operator pace all affect completed output.
The units differ: one listing counts labels, while the other counts pieces. They offer a point of comparison but do not establish identical performance across machines or production conditions. For a bottle run, record how many correctly labelled containers you complete during a timed work period. Include pauses for loading, adjustments and inspection to estimate practical throughput.
Use a representative batch to assess the pace. Keep the container format, label roll and operator consistent, then record the number of completed, acceptable units and any interruptions. A small glass jar with a narrow label may move through the process differently from a larger bottle with a wraparound label. The trial shows whether handling or label placement is slowing production.
Separate application time from supporting tasks. A manual operator may need to position each container, advance the label and remove the finished item. A semi-automatic setup changes the work sequence but still requires container handling and attention to placement. Include roll changes and setup adjustments in the total elapsed time.
- Maximum rate: Compare the machine’s listed capacity with the output your workflow requires.
- Usable throughput: Count correctly labelled containers, not only labels dispensed.
- Production pauses: Include loading, roll changes, adjustments and quality checks.
Batch consistency matters. Switching production between a small jar and a larger bottle can affect the pace. Grouping the same container and label format together can reduce repeated setup changes. Record each format separately so a fast run does not disguise a slower container or label combination.
Build a realistic schedule from completed units per work period rather than applying a maximum rate to an entire shift. That approach overlooks breaks in application, setup and inspection. For example, if a run includes several label designs, allow time to change rolls and confirm placement for each design.
Consider application quality alongside speed when deciding whether a manual or semi-automatic machine fits. A faster run that produces misaligned labels creates rework and reduces usable output. Compare acceptable containers completed, time spent correcting errors and operator effort. These measures make listed rates more useful for real production decisions.
Manual round-bottle labeler speed
A manual round-bottle applicator listing specifies a maximum application rate of 30 labels per minute. That figure is a ceiling for the listed machine, not a guaranteed pace for every bottle, label or operator. The useful takeaway is to judge speed by correctly labelled containers completed in your own workflow.
Each application involves more than advancing a label. The operator positions a cylindrical bottle, supports it as the rollers turn and handles the finished container. Loading, removing bottles and checking placement all affect the run. A short, consistent label on a straight-sided bottle may move through a batch differently from a large wraparound label.
Use a representative production trial to find a practical rate. Set up the actual bottle and label roll, then record the time for a sample run. Count acceptable, fully labelled containers rather than labels dispensed. Include setup, pauses and corrections in the elapsed time, since these tasks also take up the operator’s time during production.
Keep trial conditions consistent. Use the same bottle shape, label format and operator throughout each test. If you switch from a small cylindrical jar to a taller bottle, record the results separately. Different dimensions can affect how quickly containers are positioned and turned, while label placement may require more attention.
Surface quality is part of throughput. Fast application that leaves crooked labels or bubbles can create rework and reduce usable output. Inspect samples during the trial, not just at the end. If labels drift, pause and adjust the bottle’s starting position or the label feed before continuing the batch.
For a dependable production estimate, track these factors during the run:
- Application: Time the label feed and bottle rotation for the chosen format.
- Handling: Include placing each container and removing it after labelling.
- Quality: Count labels that sit smoothly and in the intended position.
- Interruptions: Record roll changes, adjustments and repeated applications.
Compare the trial’s completed output with your production needs. If one operator struggles to keep bottles moving while maintaining consistent placement, the listed maximum rate will not reflect practical capacity. A steady, repeatable pace with fewer corrections can be more useful than chasing the machine’s top rate.
For help matching a bottle labelling machine to your container formats and workflow, contact the team about your application.
DuraFast Label Company Canada
DuraFast Label Company Canada helps you consider label printing options when manual application no longer fits your production workflow. If you are weighing hand-applied labels against printing product labels for small containers, compare your label format, volume and production needs before choosing equipment.
DuraFast offers VIPColor, Afinia, Toshiba and Honeywell label printers. These print labels, rather than apply them, and may suit businesses producing their own labels for a separate application process. The right option depends on whether your main need is applying existing labels or printing labels for your products.
Contact DuraFast Label Company Canada to discuss your label printing needs and workflow.
Plan the next step in your labelling workflow
Before changing your process, decide whether your main need is applying labels or producing them. A manual bottle labeler for small jars and bottles handles application; a label printer produces the labels. Keeping those tasks distinct helps you plan equipment around your workflow and avoid choosing a solution for the wrong stage.
DuraFast Label Company Canada offers VIPColor, Afinia and Primera label printers for businesses producing their own product labels. If printing is your next step, consider how your label designs, container formats and production plans fit together. The right approach can support a smoother transition as your product range or labelling needs evolve.
For guidance on label printing options that fit your workflow, contact DuraFast Label Company Canada. A clear understanding of your next production need is a practical place to begin.
Frequently Asked Questions
Which manual labelers can handle different container diameters and shapes?
Adjustable tabletop applicators are a practical choice when a run includes cylindrical containers of different diameters. For square or rectangular packages, use a method designed for flat panels rather than assuming a round-bottle machine will handle corners evenly. For example, a producer labelling both a narrow round jar and a wider bottle should test each format with its own sample. Container shape and support during rotation matter as much as diameter.
What minimum and maximum label sizes do manual bottle labelers support?
There isn’t one standard size range across manual labelers. A listed manual round-bottle machine supports labels from 10 to 110 mm wide and 10 to 300 mm long; another manual applicator listing gives a width range of 15 to 120 mm. Treat these as model-specific examples. Measure the label face and compare both dimensions with the selected machine’s limits before preparing a roll.
How accurate and fast are tabletop manual bottle labelers?
Tabletop machines can support repeatable placement, but accuracy depends on consistent loading and label positioning. A manual applicator listing gives a maximum rate of 30 labels per minute, not a guaranteed production pace. To assess your workflow, time a sample batch and count correctly placed labels, including time spent handling containers and correcting errors. This gives a more useful estimate than relying on the listed maximum alone.
What features should I compare when choosing a manual labeler for small jars?
Compare the container shape and diameter range, label width and length limits, and compatible roll core and outside diameter. Consider whether the label format suits the feed path and whether changing between jar sizes will require repeated adjustments. For example, a small jar with a narrow front label creates different handling demands from a jar with a wraparound label. Match the machine to your actual containers and rolls.
How do you set up and use a manual bottle labeler?
Place the applicator on a stable work surface, load a compatible label roll and thread the backing through the feed path according to the machine’s instructions. Position an empty sample container against the supports, then advance the label while turning the container steadily. Inspect the result before starting the batch. If placement is off, adjust the starting position or feed alignment, then test another sample.
What maintenance, safety, and common alignment issues should buyers consider?
Keep the applicator’s rollers and label path clean, and remove adhesive residue only using methods allowed by the manufacturer’s instructions. Check that the machine sits securely before operating it, and keep fingers clear of rollers and feed points while advancing labels. Crooked placement can result from a shifting container, uneven label feed or inconsistent starting position. A sample run helps identify these issues before they affect a full batch.