How to compare gold polyester inkjet label roll finishes and prices
29th Oct 2026
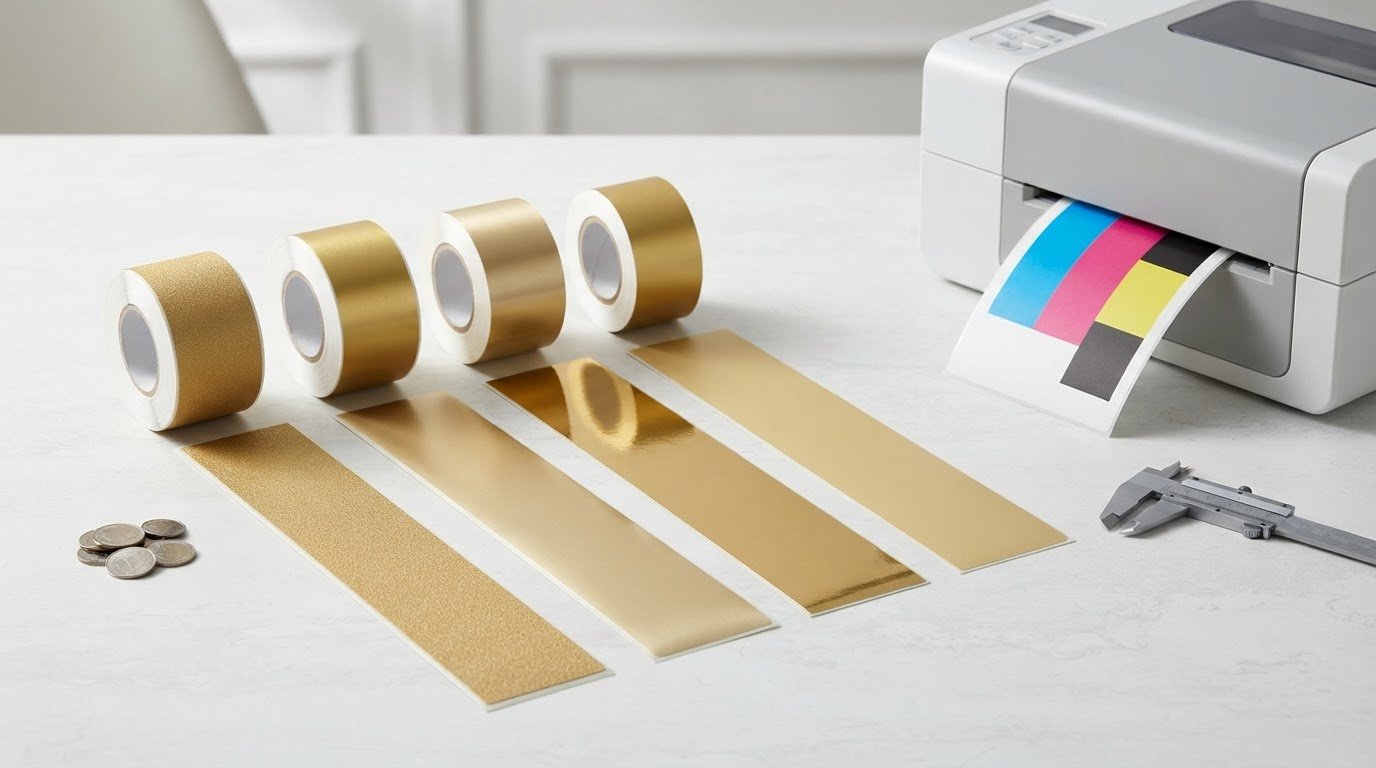
The main differences between gold polyester inkjet label rolls and standard inkjet roll labels are their appearance, face material, available finishes, intended environment, and roll format. Compare the finish and material specifications with your application, then match the label dimensions and roll setup to your printer. Those details matter more than choosing a gold colour alone.
A gold finish gives product or identification labels a distinctive look, but the roll must also suit its intended use. Compare indoor or outdoor exposure, surface finish, label and core size, and how the roll’s construction affects its price.
This guide explains how to compare sandy, silky, glossy, and matte finishes, assess use conditions, and evaluate prices, formats, and roll dimensions. Use these practical checks to narrow your options and choose labels that fit your printer and application.
Key Takeaways
- Choose a finish by balancing the look and feel you want with how the label will be seen and handled.
- Match the label material and adhesive to the conditions of use, especially where moisture, condensation, or changing temperatures are involved.
- Compare prices on equivalent label formats and materials so differences in size and construction don’t distort your assessment.
- Match label dimensions, core size, and roll diameter to both your printer and your workflow before selecting a roll.
- Use your application and print setup to narrow the options before comparing specific label rolls.
Finishes including sandy, silky, glossy, and matte
Compare finishes by appearance, surface feel, and how clearly printed information shows. On gold polyester inkjet label rolls, a glossy face reflects more light, while a matte face reduces shine. Sandy and silky describe contrasting surface textures.
Common problems include blurred or smudged printing and labels lifting from a surface. Reduce the risk by choosing inkjet-compatible stock, selecting the printer’s matching media setting, and applying labels to a clean, dry surface.
- Decide what the label needs to communicate before choosing a finish. For a gold product label displayed under bright retail lighting, matte can reduce distracting reflections. If shine is part of the design, consider glossy. Check that small text remains legible against the gold background.
- Use sandy and silky as practical descriptors when comparing textures. Sandy suggests a more noticeable, textured feel; silky suggests a smoother one. If labels will be handled often, consider which texture suits the product and the impression you want its packaging to create.
- Assess colour and contrast in the actual layout. Gold has a reflective appearance, so fine lettering, pale colours, and thin lines may be harder to distinguish. Test a sample design with the intended text, logo, and barcode before choosing a finish for the full print run.
- Match the stock to the printer, not just to the desired appearance. Inkjet labels need a surface designed to receive inkjet ink; incompatible material can produce weak colour, uneven coverage, or smearing. Select the printer’s media setting for the stock, then let a test print dry before assessing the result.
- Prepare the application surface before assessing adhesion. Wipe away dust, oil, and moisture, then apply a test label to the intended container or package. Adhesive makes better contact with a clean, flat surface than with a dusty or damp one. Check the edges and corners after application.
- Compare real samples under the lighting and handling conditions of your workplace. A glossy gold label may look different beneath warehouse lights than beside a window. Inkjet label options can be reviewed by material and format through inkjet label materials; use the product details to narrow your sample choices.
Indoor and outdoor use
Gold polyester labels may suit indoor or outdoor applications, but the face material alone doesn’t establish performance against every exposure. The adhesive is stated to perform from -4 to 176 °F; this range doesn’t specify resistance to water, ultraviolet light, chemicals, or abrasion.
Assess Indoor and Outdoor Suitability
List where the label will be applied and what conditions it will face. A dry indoor package has different demands from an outdoor container exposed to sunlight, rain, and handling. Match the face material and adhesive to the surface, conditions, and expected use. Polyester alone does not make a label suitable for every outdoor setting.
Check Resistance to Exposure and Wear
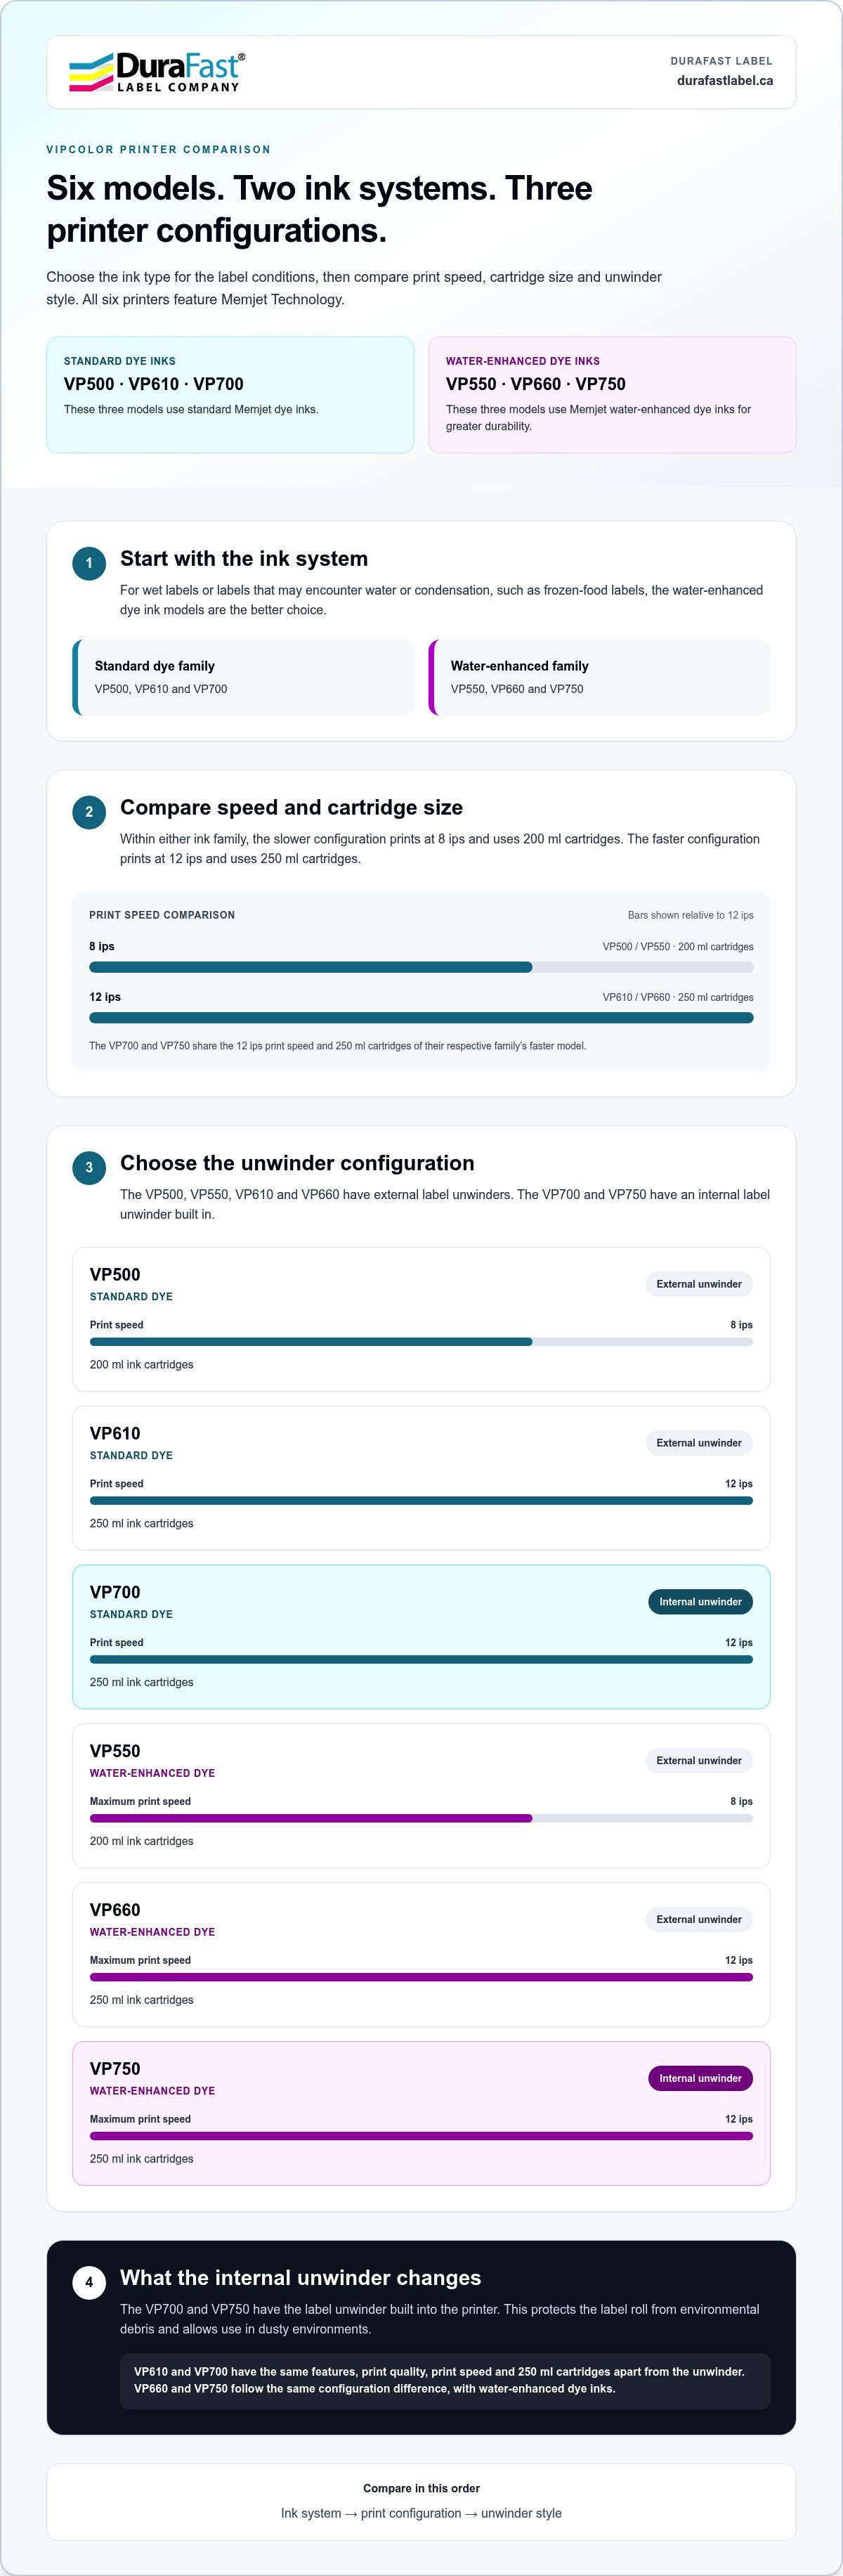
Assess water, UV exposure, chemicals, and abrasion separately: resistance to one does not establish resistance to the others. Polyester describes the label face, while ink and adhesive also affect performance. The label materials in the listed range are validated for dye-based and pigment-based inks. For wet labels or condensation, water-enhanced dye inks are a better choice than standard dye inks.
- Identify the actual exposure. Note whether a label will stay indoors, sit near a window, or spend time outside. Include contact with water, condensation, cleaning products, and rubbing during transport. A refrigerated food container may face condensation, while a garden product may encounter sun and rain. Each use calls for different performance checks.
- Separate temperature from weather resistance. The adhesive’s stated range, -4 to 176 °F, describes its temperature performance, not a guarantee against rain or prolonged sunlight. Use the range when considering the operating environment, then assess moisture and UV exposure independently. Don’t treat a temperature specification as proof of outdoor durability.
- Match ink to moisture exposure. For labels that may get wet or encounter condensation, choose a print system using water-enhanced dye inks. Standard dye inks and water-enhanced dye inks are distinct options. The material’s ink validation covers both dye-based and pigment-based inks, but the conditions of use still matter.
- Test a finished label on its real surface. Print the intended artwork, apply it to the actual container, and expose it to the expected conditions. After handling, check for smearing, fading, lifting edges, or surface wear. A test on a clean, dry sample does not represent a damp, curved, or frequently rubbed application.
- Record what the test reveals. Note the label material, ink type, application surface, and exposure conditions. If a label will contact a particular chemical or face repeated abrasion, test those conditions directly rather than relying on a general description of polyester. This gives you a practical basis for comparing label constructions.
Inkjet roll label pricing
Compare like with like: label material, finish, dimensions, roll configuration, and printer compatibility all affect a quote’s value. A glossy paper roll and a matte polypropylene roll are not equivalent comparisons for gold polyester labels.
- Match the specifications before comparing costs. Record the material, finish, label dimensions, core, and roll quantity for each option. For example, a 4″ × 3″ glossy roll differs from a 4″ × 2″ matte polypropylene roll in both size and construction. Those differences can affect the cost per usable label, so compare matching formats wherever possible.
- Check ink compatibility against the label material. The label materials in the listed range are validated for dye-based and pigment-based inkjet inks. Confirm that your printer uses the ink type suited to the job, then compare compatible materials rather than treating all inkjet stocks as interchangeable. This helps prevent a low quote from concealing a mismatch with your setup.
- Account for the adhesive and operating temperature. The stated adhesive performance range is -4 to 176 °F. Compare that range with the conditions your labels will face, including storage and application temperatures. This rating describes temperature performance; it doesn’t by itself establish resistance to water, chemicals, sunlight, or abrasion.
- Price the full label format, not the finish alone. Gold polyester inkjet label rolls can differ in surface, dimensions, and roll construction. Larger labels use more material per piece, and specialty faces can differ from standard paper stock. First compare the exact application and format, then assess each quoted roll against those requirements.
- Prepare representative artwork and a test print. Set the document to the finished label dimensions, keep text and important graphics within the printable area, and ensure suitable contrast against the gold face. Select the printer’s media setting for the stock, then print a sample. Review colour, fine text, and barcode readability before approving the material for production.
- Include waste and usable output in your comparison. Check whether the label size fits the design without excessive blank space, and consider how the roll feeds through your printer. A well-matched format can reduce unused material and reprints. Compare the number of usable labels for the same job, not just the apparent cost of differently sized rolls.
Label dimensions and formats
Choose label dimensions around the information, surface, and printer feed, not appearance alone. The listed 4″ × 3″ and 4″ × 2″ formats offer concrete starting points for comparing layout needs.
- Measure the application area. Record the flat space available on the product, container, or package. A 4″ × 3″ label needs more room than a 4″ × 2″ label, so check the panel width and height before selecting a roll. Leave space around edges, seams, curves, or corners that could interfere with application.
- Set the label orientation. Decide which dimension runs across the roll and which follows its feed direction. For a 4″ × 3″ design, placing the 4″ edge across the label may suit a wide product name. Rotating the layout can better accommodate a tall ingredient panel or vertical barcode. Confirm the orientation in the print file.
- Fit the content to the face. Place the product name, logo, required copy, and barcode within the printable area. A 4″ × 2″ label may suit a short brand name and compact details, while a 4″ × 3″ face provides more layout room. Keep important text away from edges and test small type at actual size.
- Check the printer’s supported label path. Compare the roll width and label feed direction with the printer’s media requirements. The printer must track the chosen format consistently so each label lands in the correct position. Use the matching media-size setting, then print a sample and inspect alignment from the first label through the roll.
- Account for label spacing and cut shape. Review the gap between labels and the shape of each die-cut face. A rectangular 4″ × 3″ label uses its area differently from a compact 4″ × 2″ design. Confirm that the artwork fits within the cut line, with no text or barcode crossing the edge or gap.
- Compare formats using the same job. Put the same artwork on both 4″ × 3″ and 4″ × 2″ layouts. Check legibility, unused space, barcode placement, and how the label sits on the product. This side-by-side test shows whether the larger face adds useful room or simply increases the label footprint.
- Save the final dimensions with the artwork. Name the file using the finished width and height, such as “4 × 3” or “4 × 2.” Store the orientation and printer media setting alongside it. This helps production staff select the intended format and reduces errors when reprinting the same design.
Roll core and outer-diameter sizes
Match the roll’s core and outer diameter to the printer’s holder and available clearance. A listed inkjet roll format uses a 3″ core, but that detail alone doesn’t establish printer compatibility.
- Measure the core opening. The core is the cardboard tube at the centre of the roll. Compare its inner diameter with the printer’s spindle or holder. For example, a roll with a 3″ core needs a holder that accommodates that opening. A mismatch can prevent loading or cause the roll to sit unevenly.
- Check how the roll is supported. Find out whether the printer uses a spindle, fixed posts, or an external holder. The core must sit securely on the support and rotate as labels feed. If the roll wobbles or binds, feeding can become inconsistent and affect print alignment and label presentation.
- Measure the roll’s outer diameter. This is the full width across the wound roll, from one outer edge through its centre to the opposite edge. Compare the measurement with the space available in the printer. A roll can have the right core and still be too large for the printer compartment.
- Account for the label material and winding. Roll diameter depends partly on how much material is wound around the core. Label dimensions, backing, and roll quantity all affect the finished size. For instance, two rolls with 3″ cores may have different outer diameters if their label formats or quantities differ.
- Check the feed path and unwind direction. Note where the roll sits and how the label face should unwind toward the printhead. The label must pass through the guides without rubbing against the printer housing. Even with the right core, an unsuitable unwind direction can disrupt feeding or present the label incorrectly.
- Leave room for the roll to turn. Compare the outer diameter with the printer compartment, guides, and nearby surfaces. The roll needs clearance to unwind smoothly as its diameter decreases. Avoid a setup where it presses against a cover or catches on a cable.
- Run a feed test before production. Load a roll, advance several labels, and watch for slipping, skewing, or resistance. Record the core size, outer diameter, and feed direction that work with your printer. This setup note helps staff reload the same format consistently.
Have a particular roll format in mind? Discuss your label roll requirements to help narrow the options for your printing setup.
DuraFast Label Company Canada: VIPColor Label Printers
DuraFast Label Company Canada offers VIPColor label printers for businesses considering colour-printing equipment alongside gold polyester labels. Compare the printer’s ink type and feeding setup with your chosen roll, then consider how you’ll use the finished labels.
Check the printer’s ink type when choosing labels. The VP550, VP660, and VP750 use Memjet water-enhanced dye inks for labels that may encounter water or condensation. DuraFast also offers Afinia Label Printers for businesses comparing inkjet printer options.
To discuss your label-printing requirements, contact DuraFast Label Company Canada or visit durafastlabel.ca.
Put your label choice into production
Turn your preferred look and application needs into a clear purchasing specification. Record the finish, label dimensions, roll setup, printer, and expected exposure conditions together. This gives your team a consistent reference for reviewing samples, preparing artwork, and planning future orders. Save an approved print sample so you can compare later batches with the appearance you selected.
For equipment, DuraFast Label Company Canada offers VIPColor and Afinia label printers. Consider your ink requirements, printing workflow, and label use when deciding which printer range fits your operation. Pairing a suitable printer with gold polyester inkjet label rolls helps align the finished label with your packaging goals and production process.
Ready to discuss your label-printing requirements? Contact DuraFast Label Company Canada to take the next step. With a clear specification in hand, you can move forward with greater confidence.
Frequently Asked Questions
What differences are there with inkjet roll labels?
Gold polyester inkjet rolls are roll-fed inkjet labels with a gold polyester face. “Inkjet roll labels” is a broader category that includes different face materials, colours, and finishes. Compare the material and printer compatibility, not just the fact that both products come on rolls. Gold polyester and white paper labels, for example, may print on the same type of printer but give a package different looks.
What are gold polyester inkjet label rolls used for?
These rolls print information or branding on labels with a gold polyester face. A maker might use them for product identification or branded packaging when a gold appearance suits the design. Choose a format that fits the container’s label area and the information to include. A short product name may suit a compact design, while a larger label allows more room for copy and graphics.
What sizes, core diameters, and roll lengths are available in Canada?
Inkjet roll examples include 4″ × 3″ and 4″ × 2″ labels, with 3″ cores listed for those configurations. These examples don’t establish that every dimension is available in gold polyester. Roll length depends on the specific roll configuration, so compare the label count per roll alongside the label size. Before selecting a format, match its core and outer diameter to your printer’s holder and clearance.
How much do gold polyester inkjet label rolls cost in Canada, including shipping and taxes?
The total depends on the material, finish, label dimensions, roll configuration, and order quantity. Compare equivalent specifications rather than treating differently sized or constructed rolls as direct price matches. For a delivered-cost comparison, add any quoted shipping and applicable tax shown for the order to the item price. Also compare how many usable labels each roll provides for your design and printer setup.
Which Canadian retailers or suppliers sell gold polyester inkjet label rolls?
DuraFast Label Company Canada sells label printers and supplies, including inkjet-related options. When comparing gold polyester rolls, focus on the exact face material and finish, dimensions, core, and printer compatibility. A supplier’s broader inkjet range does not mean every material comes in every configuration, so use the product specifications to assess each roll for your application.
How do gold polyester inkjet labels compare with gold foil paper or laser-printable labels?
Gold polyester is a film label material; gold foil paper has a paper face with a gold appearance. The material affects the finished label’s feel and presentation. Laser-printable stock is designed for a laser printer, while inkjet stock is designed for inkjet printing. Match the label to the printer technology first, then compare appearance, surface, and application requirements.
How durable are gold polyester inkjet labels against water, UV, chemicals, and abrasion?
The polyester face alone does not establish resistance to water, UV, chemicals, or abrasion. Assess and test each exposure separately. For wet or condensation-prone use, water-enhanced dye inks are a better choice than standard dye inks.
Which gold polyester inkjet label rolls are compatible with inkjet printers?
Choose inkjet-compatible gold polyester stock. The listed label materials are validated for both dye-based and pigment-based inkjet inks. Select the printer’s matching media setting and test a print before production.